Table of Contents
The Fashion Photography Challenge
Fashion photographers, e-commerce managers, and clothing brands constantly face a significant challenge: efficiently showcasing multiple clothing options without the time and expense of repeated photoshoots. When a model needs to display different jackets or when inventory changes require updated product images, traditional methods demand either scheduling new photography sessions or attempting complex manual clothing replacements in Photoshop. The latter involves tedious selection work around complex elements like hair, intricate fabric folds, and accessories, followed by challenging perspective adjustments and lighting matching that can consume hours per image while often producing unconvincing results.
What if you could transform your model’s outfit with a single AI command? This guide demonstrates how to use Nano Banana in Photoshop, the advanced AI feature within the PsAide plugin, to seamlessly swap jackets and other clothing items. This revolutionary approach eliminates the need for repeated photoshoots and complex manual editing, allowing fashion professionals to visualize multiple outfit combinations from a single photograph with natural-looking results that maintain original lighting and proportions.
Why Manual Clothing Replacement Falls Short
Manually replacing jackets in Photoshop presents multiple technical obstacles that separate amateur results from professional ones. The process requires pixel-perfect selections around complex boundaries where hair meets clothing, precise recreation of fabric folds and shadows that match the body’s posture, and accurate color matching to the original photograph’s lighting conditions. Even with advanced tools like Select Subject and Refine Edge, achieving natural integration proves challenging, as replaced clothing often appears unnaturally flat, improperly shadowed, or misaligned with the body’s contours. These limitations become particularly problematic for e-commerce applications where product accuracy and visual appeal directly impact sales conversions.
The Nano Banana Photoshop method addresses these challenges through intelligent contextual analysis. Rather than treating clothing replacement as simple image layering, the AI comprehensively understands the relationship between the garment and the human form. It analyzes body posture, identifies how the original jacket drapes and folds, recognizes lighting direction and intensity, then applies this understanding to integrate the new jacket with appropriate three-dimensional shaping and environmental adaptation. This represents a fundamental shift from manual technical manipulation to AI-assisted creative transformation.
Preparing for Fashion Transformation
- Software: Adobe Photoshop with the PsAide plugin installed
- Base Image: High-quality fashion photograph with clear visibility of the jacket to be replaced
- Target Jacket: Well-lit product image of the replacement jacket (preferably on a mannequin or plain background)
- Technical Requirements: Images should have similar lighting directions for optimal integration
- Time Efficiency: Complete transformations in 2-4 minutes per image
The 3-Step AI Jacket Replacement Process
Step 1: Select and Organize Your Images
Begin by opening both your original model photograph and your target jacket image in Photoshop. For optimal results, choose a base photograph where the model’s pose clearly shows the jacket’s structure without excessive wrinkling or obstruction from accessories. Your replacement jacket image should ideally show the garment from a similar angle and under comparable lighting conditions—though the AI can compensate for moderate differences. Organize your workspace with both images visible, and ensure you’re working with high-resolution files to preserve detail throughout the transformation process.
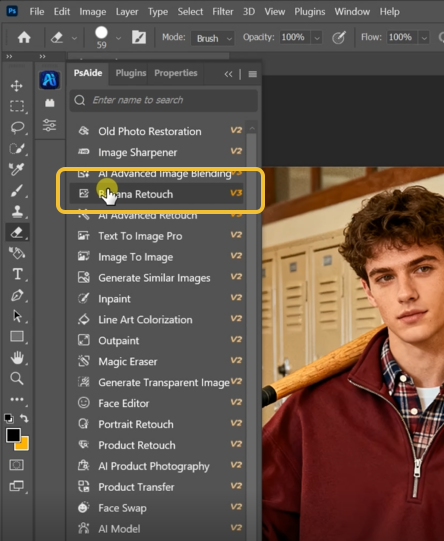
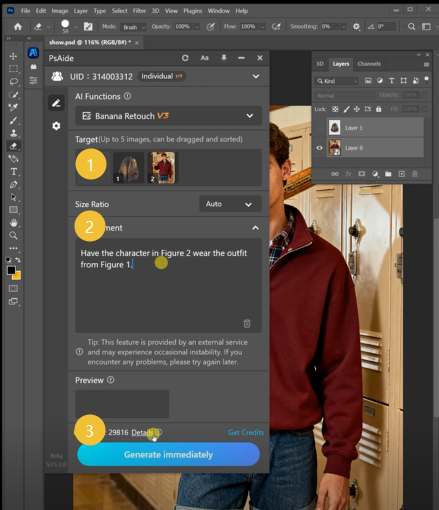
Step 2: Upload Images and Provide Clear Instructions
Open the PsAide panel and launch Nano Banana. Upload your two images in this specific sequence:
- Figure 1: Your original model photograph with the jacket to be replaced
- Figure 2: Your target jacket image
In the text prompt box, use this precise instruction:
“Replace the jacket in Figure 1 with the jacket in Figure 2, maintaining original body posture and lighting conditions.”
This enhanced prompt provides the AI with crucial additional context. By specifying “maintaining original body posture,” you ensure the new jacket adapts to the model’s specific stance rather than appearing generically applied. The “lighting conditions” instruction helps the AI adjust the replacement jacket’s appearance to match the original photograph’s illumination, creating more natural integration than a simple overlay would achieve.
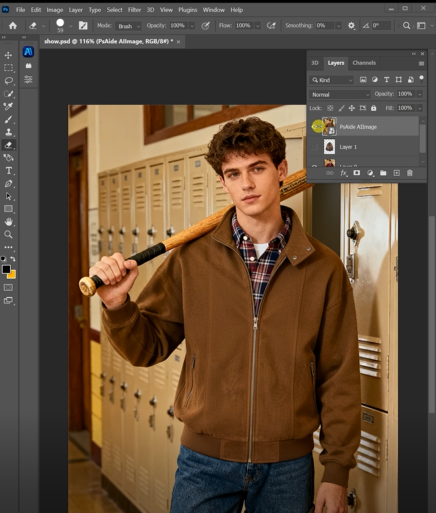
Step 3: Generate and Refine Your Fashion Image
Click the “Generate” button and wait approximately 30-60 seconds for processing. Nano Banana will analyze both images, identifying the original jacket’s boundaries and how it interacts with the model’s body, then extract and adapt the replacement jacket to fit naturally within the existing photograph. The AI automatically handles complex adjustments including perspective correction to match the body’s angle, scaling to appropriate proportions, fabric draping simulation that follows the pose, and lighting adaptation that maintains environmental consistency.
The result will be a professionally integrated fashion image where the new jacket appears as if it was worn during the original photoshoot. For final refinement, use Photoshop’s healing tools to address any minor imperfections around edges, and apply subtle color correction if needed to perfect the color matching between the jacket and the original scene.
Professional Applications in Fashion and E-commerce
Master this technique for numerous industry applications:
- E-commerce Catalog Management: Quickly update product images when styles change or new colors arrive
- Fashion Design Visualization: Test how new designs would look on different body types without producing samples
- Marketing Campaigns: Create multiple outfit variations from a single photoshoot for seasonal campaigns
- Personal Styling Services: Show clients how different jackets would look with their existing wardrobe items
- Costume Design: Visualize historical or theatrical costumes on modern photographs
Fashion Editing Technical Guide
Q1: What if the replacement jacket doesn’t match the original photo’s color temperature?
A: The AI generally handles color adaptation well, but for challenging lighting mismatches, you can enhance your prompt: “Replace the jacket in Figure 1 with the jacket in Figure 2, adjusting colors to match the warm indoor lighting of the original photo.” For post-generation correction, use a Color Balance adjustment layer clipped to the jacket layer, sampling colors from the original photo’s environment for perfect matching.
Q2: How can I ensure proper fitting around complex areas like collars and sleeves?
A: For optimal results with detailed jacket elements, choose replacement images showing the garment in a similar posture to your model. If the poses differ significantly, consider using this modified prompt: “Replace the jacket in Figure 1 with the jacket in Figure 2, adapting the fit to follow the model’s posture while maintaining the jacket’s design features.” The AI’s understanding of garment construction helps it adjust proportions appropriately.
Q3: Can I replace only part of a jacket or blend elements from multiple garments?
A: For partial replacements or hybrid designs, use more specific marking. Before uploading, use Photoshop’s selection tools to isolate the exact portion you want to replace, then mention this in your prompt: “Replace only the sleeves of the jacket in Figure 1 with the sleeves from the jacket in Figure 2.” This targeted approach allows for customized garment modifications beyond complete swaps.
Q4: What’s the optimal image resolution for fashion applications?
A: Use high-resolution images (minimum 3000 pixels on the longest side) for commercial fashion work. This ensures sufficient detail for fabric texture visibility and allows for potential cropping or larger format applications. For e-commerce specifically, maintain consistency with your existing product image dimensions to ensure uniform presentation across your catalog.
Q5: How does this compare to 3D garment simulation software?
A: While 3D simulation offers precise control over fabric physics, it requires specialized skills and significant setup time. The Nano Banana Photoshop method provides faster, more accessible results suitable for visualization and marketing purposes. It excels at integrating real garment photographs into existing scenes, whereas 3D simulation creates garments digitally from scratch—different tools for different stages of the fashion workflow.
Download link
https://psaide.com/?sfrom=A86R4u
Invitation Code: A86R4u