Table of Contents
The Old Photo Restoration Challenge
For archivists, genealogists, photographers, and families everywhere, damaged historical photographs represent a precious yet fragile link to the past. These images suffer from decades of deterioration—fading colors, surface scratches, chemical stains, physical tears, and moisture damage that gradually erase irreplaceable memories. Traditional restoration in Photoshop demands expert-level skills with clone stamping, frequency separation, and manual color correction, often requiring 5-10 hours of meticulous work per image. This technical barrier leaves countless historical photos trapped in deteriorating conditions, with many people abandoning restoration attempts after frustrating initial efforts.
What if you could transform a damaged century-old photograph into a clean, restored image with a single click? This guide demonstrates how to use Old Photo Restoration in Photoshop through the PsAide plugin, leveraging advanced AI technology to automatically repair the most common forms of photographic damage. This revolutionary approach eliminates the months of practice traditionally required for photo restoration, making professional-quality results accessible to anyone with Photoshop and preserving family histories that might otherwise be lost to time.
Why Manual Photo Restoration is Overwhelming
Traditional photo restoration represents one of Photoshop’s most demanding disciplines, requiring multiple advanced techniques working in harmony. A single damaged photograph might need scratch removal using the Healing Brush with precise source sampling, tear repair through careful cloning and texture recreation, color correction via channel mixing and selective hue adjustments, and missing section reconstruction requiring artistic reconstruction skills. Each task demands not only technical proficiency but also historical knowledge about photographic processes and materials—understanding how sepia tones age or how silver gelatin prints deteriorate. Even professionals can spend days on a single image, while beginners often create unnatural-looking “over-restored” results that lose the original photograph’s character.
The PsAide Old Photo Restoration feature fundamentally changes this dynamic by applying artificial intelligence specifically trained on thousands of before-and-after restoration examples. Instead of manually addressing each flaw, the AI analyzes the entire image holistically, distinguishing between intentional image content (faces, clothing, backgrounds) and damage artifacts (scratches, stains, fading). This allows it to repair damage while preserving authentic historical details—a balance extremely difficult to achieve manually.
What You Need to Begin Restoration
- Software: Adobe Photoshop with the PsAide plugin installed
- Source Image: Scanned photograph (300-600 DPI recommended for best detail preservation)
- Scanning Tips: Scan at the highest resolution possible, even if the photo is small
- Damage Types: Works on scratches, fading, water stains, minor tears, and color shifts
- Time Required: 20-30 seconds of processing plus scanning/preparation time
The One-Click Restoration Process
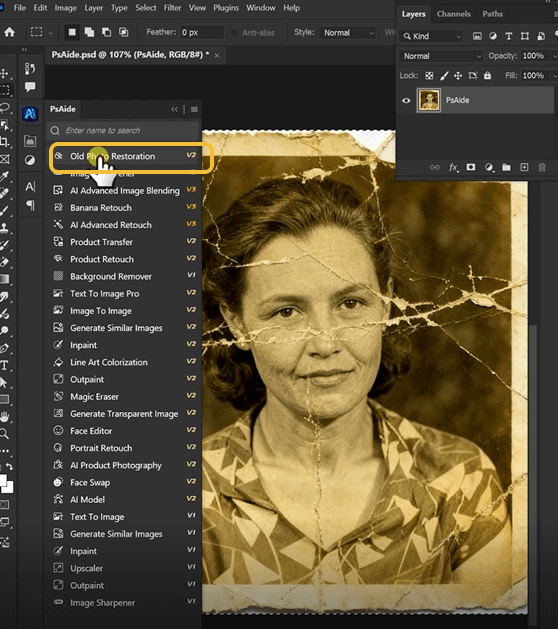
Step 1: Prepare and Upload Your Damaged Photo
Begin by digitizing your old photograph using a scanner or high-quality camera photograph. For physical photos with curled edges or severe bending, use gentle weights (like clean glass) to flatten during scanning without applying damaging pressure. Open the scanned image in Photoshop. There’s no need for preliminary adjustments like levels or cropping—the AI will analyze the image as provided. Navigate to the PsAide panel within Photoshop’s interface and select the Old Photo Restoration module. This specialized tool is designed specifically for historical photo repair, with algorithms optimized for common deterioration patterns found in vintage images.

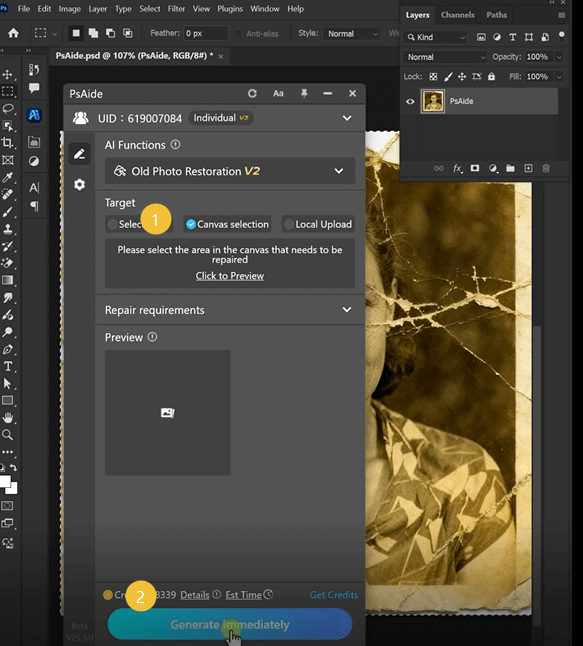
Step 2: Generate and Witness the Transformation
Click the “Restore” or “Generate” button within the Old Photo Restoration interface. The AI will process your image—this typically takes 15-25 seconds depending on image size and complexity. During this brief period, the system performs multiple sophisticated operations simultaneously: it detects and removes surface scratches and dust spots, reconstructs torn or missing areas using contextual information from surrounding intact portions, corrects color fading by analyzing remaining color information, and enhances overall contrast while preserving the photograph’s historical character. Unlike manual restoration which addresses problems sequentially, the AI processes all damage types in an integrated workflow.
Step 3: Compare and Refine Your Restored Image
The restored image will appear as a new layer or separate file. Create a simple before-and-after comparison by placing the original damaged photo and restored version side-by-side. You’ll typically observe: removal of yellowing and stains, repaired physical damage, enhanced facial details and expressions, balanced contrast without losing period-appropriate tonality, and overall clarity improvement while maintaining the photograph’s authentic vintage feel. For final refinement, use Photoshop’s standard adjustment layers (like Curves for slight contrast tweaks or Hue/Saturation for subtle color balancing) to perfect the AI-generated restoration to your personal preference.

Applications and Historical Value
This restoration technique serves multiple important purposes:
- Family History Preservation: Save deteriorating family albums for future generations
- Historical Research: Prepare archival images for publications and exhibitions
- Genealogical Projects: Enhance ancestral photos for family trees and records
- Personal Projects: Restore wedding photos, childhood pictures, or travel memories
- Professional Services: Offer restoration as a commercial service with dramatically reduced turnaround time
The process respects historical authenticity while reversing damage—a crucial balance for archivists and historians.
Restoration Technical Guide
Q1: What types of damage can this AI restoration handle effectively?
A: The technology excels at addressing common deterioration: surface scratches, dust and spot removal, uniform fading, moderate staining, and minor physical tears. For severe damage where more than 30% of facial features are missing or photographs torn into multiple separated pieces, supplemental manual restoration will still be needed, though the AI provides an excellent foundation that reduces manual work by 70-80%.
Q2: Does the restoration work on both black-and-white and color vintage photos?
A: Yes, the AI is trained on monochrome, sepia-toned, and early color photographs. It recognizes different historical processes (albumen prints, silver gelatin, early color processes like Kodachrome) and applies appropriate correction algorithms. For color photos from the 1960s-1970s, it specifically addresses common issues like cyan fading or magenta shifts characteristic of those decades’ materials.
Q3: Will the restoration make my photo look artificially “new” and lose its vintage character?
A: Properly calibrated AI restoration distinguishes between damage (scratches, stains, fading) and authentic period characteristics (grain structure, soft focus, appropriate contrast ranges). The result should appear as the photo originally looked when first printed, not like a modern digital photograph. You maintain control over restoration intensity in many implementations through adjustment sliders for preservation of original grain or period-appropriate color palettes.
Download link
https://psaide.com/?sfrom=A86R4u
Invitation Code: A86R4u