Table of Contents
1.The Hat Swap Challenge & AI Solution
Q: Is swapping a knit beanie really harder than other clothing items?
A: Yes, due to texture and fit. A wool beanie has a distinct, soft texture that must interact realistically with hair. Manually replacing it requires masking around flyaway hairs and matching the fabric’s gentle folds to the head’s shape—a tedious process.
Q: How does AI handle this complex interaction?
A: Nano Banana’s AI understands material properties. When you mark the existing hat in red, it recognizes the task is to replace a head garment. It then analyzes the new hat image’s texture and drape, and intelligently conforms it to the model’s head size and hairline, blending the fibers naturally with any visible hair.
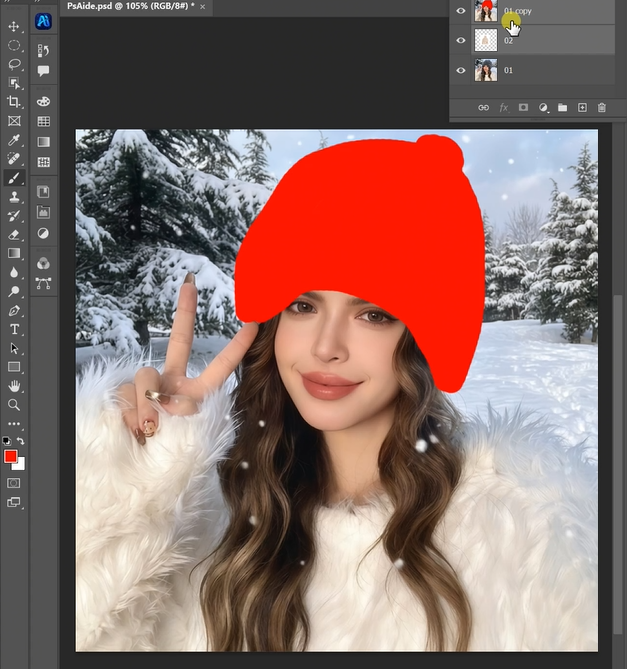
2.Why Red Marking is Essential for Precision
Marking the original hat with a solid red color is a critical preparatory step that serves as a visual command. It clearly defines the exact area for replacement, eliminating any guesswork for the AI about where the hat ends and the hair begins. This simple action ensures the swap is precise, preserving the model’s hairstyle and ensuring the new beanie sits at the correct angle and depth on the head.
3.What You’ll Need
- Adobe Photoshop with PsAide plugin.
- Click to get
- A model photo where the current hat is visible.
- A clear image of the replacement beanie/knit hat.
- 2-3 minutes total.
4.3-Step Hat Swap Process
Step 1: Prepare Images with Targeted Marking
Open both your model photo and the new hat image in Photoshop. On a duplicate layer of your model photo, use the Brush Tool with a bright red color (RGB: 255,0,0) to paint over the existing hat. Cover it completely for a clear target.
Step 2: Upload and Command the AI
Launch Nano Banana from the PsAide panel. Upload your two prepared images in this order:
- Image 1: Your new knit hat product image.
- Image 2: Your model photo with the red-marked hat.
In the prompt box, provide clear instructions:
“Swap the hat on the model in Image 2 with the hat from Image 1, ensuring a natural fit over the hair.”

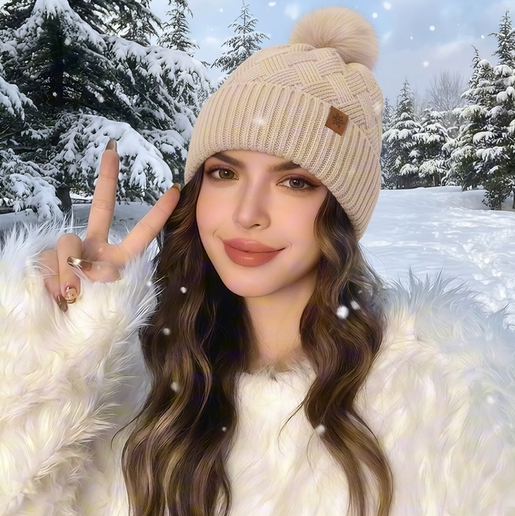
Step 3: Generate the Integrated Result
Click “Generate.” The AI will process the request, typically within 30-45 seconds. It removes the red-marked area, scales and positions the new beanie to fit the model’s head proportion, adjusts for perspective, matches the lighting and shadows of the scene, and critically, blends the hat’s edge naturally with the hairline. The output is a convincing photo of the model wearing the new hat.
5.Pro Tips for Flawless Knit Hat Swaps
For Textured Hats: Ensure your replacement hat image clearly shows the knit pattern. The AI uses this to create a realistic texture in the final composite.
Hairline Realism: The prompt addition “over the hair” helps the AI understand not to create a perfectly sharp mask, allowing for a soft, believable transition.
Lighting Match: For the most natural look, try to use a product hat image lit from a similar direction as your model photo.
Download link
https://psaide.com/?sfrom=A86R4u
Invitation Code: A86R4u
Click here to discover more usage tips and in-depth information on Nano Banana Pro!