Table of Contents
Creating professional product shots often requires expensive studio setups or complex manual compositing. Placing an object like headphones into a lifestyle scene involves matching perspective, lighting, shadows, and reflections to make it look naturally part of the environment. Traditional methods require careful masking, manual shadow creation, and extensive color matching—a process that can take even experienced designers 20-30 minutes per image.
This guide demonstrates how to use Nano Banana in Photoshop to automate this complex workflow. By using simple color markers to guide the AI, you can achieve photorealistic product integration in minutes rather than hours.
Step 1: Prepare Your Images with Color Guides
Open both your product photo (headphones) and background scene in Photoshop. For the background image, identify where you want the product to appear. Using a bright red brush, create a simple marker or outline in that area—this tells the AI where to place the product.
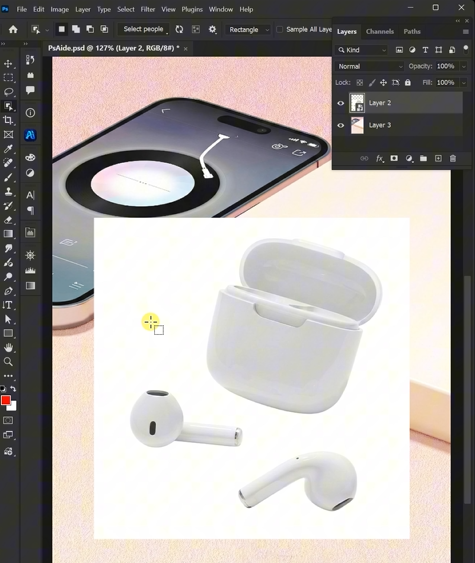
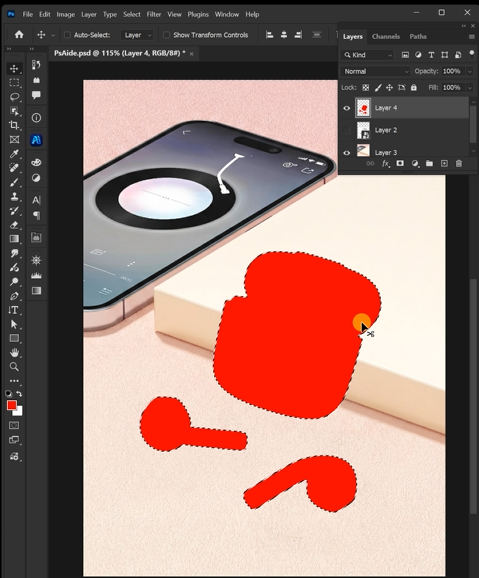
For the headphones, create a clean selection using the Quick Selection Tool or Pen Tool. Once selected, fill the headphones with the same bright red color (RGB: 255,0,0). This red fill serves as a clear visual command, indicating what object needs to be placed into the scene.
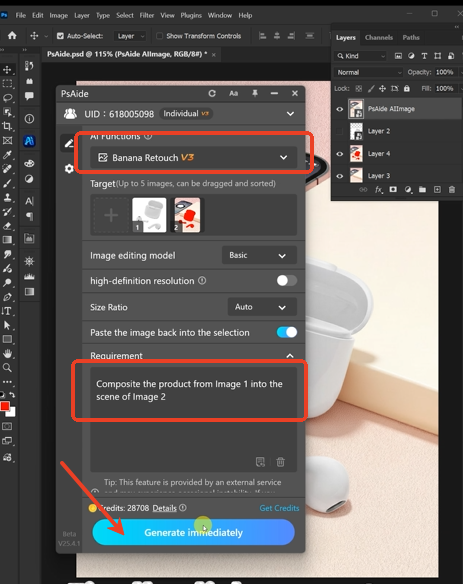
Step 2: Upload and Command the AI
Launch Nano Banana from the PsAide panel. Upload your two prepared images in this specific order:
- Image 1: Your headphones with red fill (the product to composite)
- Image 2: Your background scene with red placement marker
In the prompt box, enter this clear instruction:
“Composite the product from Image 1 into the red marked area of Image 2. Match lighting and perspective realistically.”
Step 3: Generate Professional Results
Click “Generate” and wait 30-45 seconds. The AI will process both images and perform multiple sophisticated operations:
- Object Extraction: Cleanly removes the red fill from the headphones while preserving their detailed shape
- Perspective Matching: Adjusts the product’s angle and size to match the scene’s viewpoint
- Lighting Integration: Analyzes the background’s light sources and applies appropriate highlights and shadows to the headphones
- Edge Blending: Creates natural transitions between the product and background elements

The result is a professional composite where the headphones appear naturally placed in the scene, complete with realistic shadows and perfect lighting matching.
Why This Method Works Better
- Precise Control: The red markers give the AI exact spatial information, eliminating guesswork about placement
- Contextual Understanding: Nano Banana understands terms like “composite,” “lighting,” and “perspective” in relation to photography
- Material Awareness: The AI recognizes different materials (plastic, metal, fabric) on products and renders them appropriately
- Time Efficiency: Completes in minutes what traditionally takes 20-30 minutes of manual work
Practical Applications
- E-commerce: Create lifestyle product shots without expensive photoshoots
- Marketing: Test different background contexts for advertising campaigns
- Social Media: Generate engaging visual content quickly
- Product Visualization: Show how items look in real-world environments
Pro Tips for Best Results
- Use high-resolution images for both product and background
- Ensure good lighting contrast in your original product photo
- Make red markers clearly visible but don’t worry about perfect precision
- For complex products like headphones, ensure your red fill covers all parts including cables and earpads
- If the first result needs adjustment, regenerate with more specific prompts like “add soft shadow underneath” or “match the warm lighting”
Download link
https://psaide.com/?sfrom=A86R4u
Invitation Code: A86R4u