Table of Contents
1.The Old Photo Restoration Challenge
Q: Is it possible to fix severely damaged photos without professional skills?
A: Yes, with AI. Traditional restoration requires hours of manual cloning, healing, and color correction. Old photos suffer from unique issues: chemical stains, silver mirroring, physical tears, and extreme fading that standard Photoshop tools struggle to address correctly.
Q: How does AI specifically help with historical photos?
A: AI like Old Photo Restoration is trained on thousands of before/after examples. It doesn’t just “clean” the image; it understands the historical context—recognizing that a yellow stain is damage to be removed, not part of the original sepia tone, and that a crack should be filled with plausible period-appropriate textures, not modern digital patterns.
2.Why AI Excels Where Manual Methods Fail
Manual repair often creates a “too perfect” look, stripping photos of their historical character. The AI in Old Photo Restoration is designed to repair damage while preserving authentic period details. It intelligently differentiates between:
- Damage to Remove: Scratches, dust spots, water stains, mold.
- Character to Preserve: Original film grain, period clothing textures, authentic facial expressions, natural paper tones.
This balance is nearly impossible to achieve consistently with manual tools alone.
3.What You’ll Need
- Adobe Photoshop with the PsAide plugin installed.
- A scanned copy of your old, damaged photograph (300 DPI or higher recommended).
- 30-60 seconds of processing time.
4.The One-Click Restoration Process
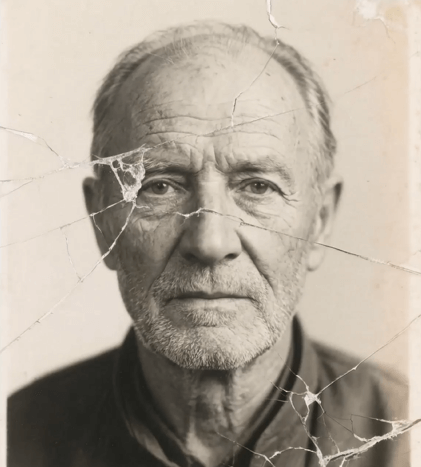
Step 1: Prepare Your Photo Scan
Open your scanned old photo in Photoshop. For best results, ensure your scan is high-resolution and captures the full photo, including borders or edges. The AI works with the image as-is—no pre-cleaning or adjustments are needed.
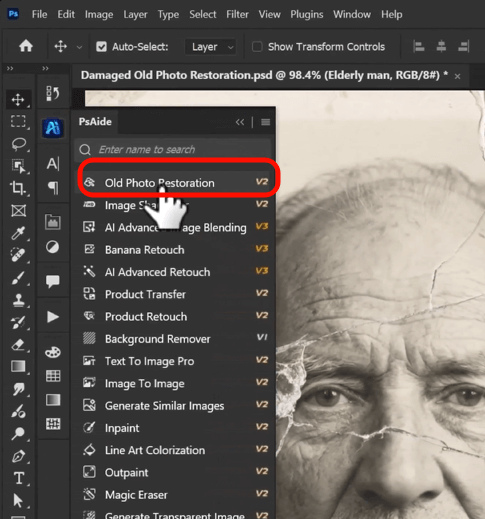
Step 2: Activate AI Restoration
In the PsAide panel, locate and select the Old Photo Restoration function. The interface is straightforward. With your photo layer selected, simply click the “Repair” or “Restore” button. There are typically no complex sliders or settings to adjust; the AI analyzes the image and applies its optimized repair algorithms automatically.

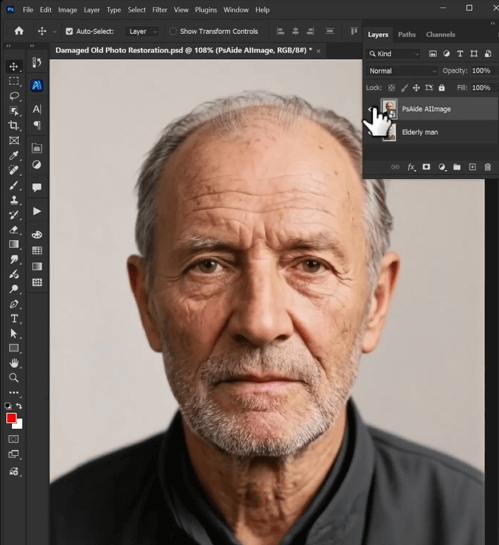
Step 3: Witness the Transformation
Click and wait 20-40 seconds. The AI processes the image, performing a comprehensive suite of repairs in one pass:
- Damage Removal: Automatically detects and removes scratches, spots, and stains.
- Tear & Crack Repair: Intelligently fills in missing sections using surrounding textures.
- Color & Tone Correction: Corrects fading, yellowing, and color shifts, often restoring a balanced, natural tone.
- Detail Enhancement: Gently sharpens facial features and important details lost to time.
A new layer or image is created, showing your photo remarkably cleaned and revitalized, yet still retaining its original character.
5.Pro Tips for Archival Quality
Final Touches: The AI provides an excellent foundation. You can use Photoshop’s standard tools for minor final tweaks, like adjusting contrast with a Curves layer, but often the AI result is ready to use.lems: If V2 doesn’t fully address issues like heavy noise or specific blurry areas, switch to Nano Banana Pro with a detailed prompt.
Scan First: Always work from a high-quality scan, never the original physical photo.
Preserve Originals: The AI tool is non-destructive. It creates a new, repaired version, keeping your original scan intact.
For Severe Damage: If a photo is torn into pieces, scan each piece separately and stitch them together roughly in Photoshop before using the tool for best results.
Download link
https://psaide.com/?sfrom=A86R4u
Invitation Code: A86R4u
Click here to discover more usage tips and in-depth information on Nano Banana Pro!