Table of Contents
This three-step AI workflow democratizes high-end jewelry retouching, enabling photographers, jewelers, and marketers to achieve catalog-quality visuals in under two minutes, bypassing weeks of technical learning.
1. Q&A: The Jewelry Retouching Challenge
Q: Why does professional earring retouching require such skill and time?
A: Jewelry retouching is a multi-step discipline. It involves non-destructively removing micro-scratches and dust without blurring the metal’s sharp edges, enhancing gemstone clarity without creating unnatural glare, and perfectly isolating the product for a clean white background—all while preserving the intricate, authentic detail that defines luxury. This traditionally requires hours of meticulous work with cloning, frequency separation, and masking.
Q: How does AI consolidate this complex workflow?
A: Nano Banana Pro treats retouching as a holistic vision. When you provide a detailed prompt, its advanced AI doesn’t just apply filters. It intelligently identifies different material types (metal, pearl, gem), applies targeted enhancements to each, performs intelligent background replacement with flawless edges, and ensures the final image has the consistent, high-end aesthetic of a brand catalog.
2. Why Pro-Grade Results Require More Than Basic Filters
Basic photo editors offer generic “clarity” or “sharpen” sliders that degrade image quality. Nano Banana Pro executes context-aware, material-specific retouching. It understands that a scratch on brushed gold should be repaired differently than a smudge on a pearl. The command for a “luxury brand quality pink pearl white background” instructs it to not only isolate the earring but to do so with the crisp, shadow-defining edges expected in high-end product photography.
3. What You’ll Need
- Adobe Photoshop with the PsAide plugin installed.
- Click to Download
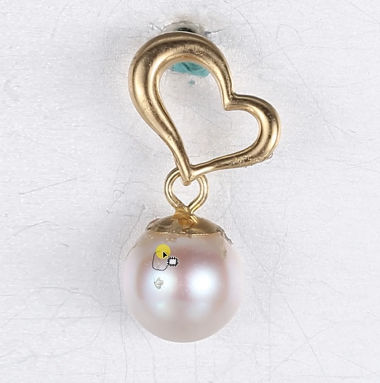
- Your Earring Photo: A well-lit shot, preferably on a non-busy background.
- Time: Approximately 60-90 seconds.
4. The Professional 3-Step Retouching Process
Step 1: Prepare Your Source Image
Open your earring product shot in Photoshop. While the AI is powerful, a clear, in-focus image will yield the absolute best results. Ensure the main details of the earring are visible.

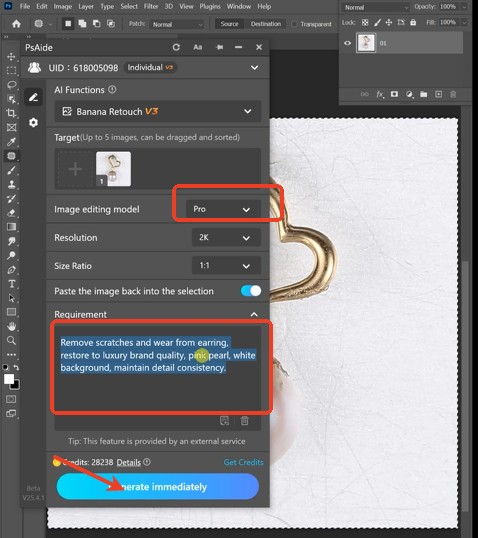
Step 2: Command the AI with Precision
In the PsAide panel, launch Nano Banana and select the Pro version. Upload your single image. In the prompt box, enter a comprehensive, descriptive command like:
“Remove scratches and wear from earring,restore to luxury brand quality pink pear whit background, maintain detail consistency.”
Step 3: Generate the Catalog-Ready Image
Click “Generate.” Within 45-75 seconds, the AI executes a full retouching pipeline:
- Imperfection Removal: Intelligently samples surrounding areas to erase scratches, spots, and manufacturing dust from metal and gems.
- Detail Enhancement: Selectively sharpens edges and enhances micro-contrast to make details “pop” without oversharpening.
- Background Replacement: Performs a flawless cutout, placing the earring on a pure white background with professional edge treatment.
- Global Harmony: Adjusts contrast and exposure to give the entire image a bright, clean, and consistent commercial look.
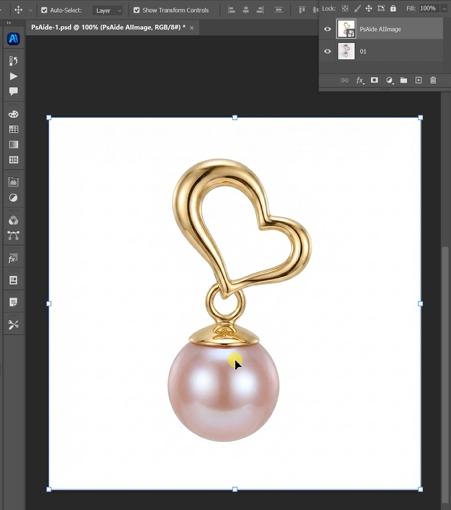
The output is a studio-quality image ready for e-commerce, advertising, or a luxury brand portfolio.
Pro Tips for Flawless Results:
- Lighting is Key: Start with a photo that has even, diffused lighting to minimize harsh shadows the AI would need to correct.
- Prompt Power: The more descriptive your prompt, the better. Mention specific materials (e.g., “rose gold,” “diamond pavé”) for even more targeted enhancement.
- Batch Processing: This method is perfect for retouching an entire product line with consistent, high-quality results.
Download link
https://psaide.com/?sfrom=A86R4u
Invitation Code: A86R4u