Table of Contents
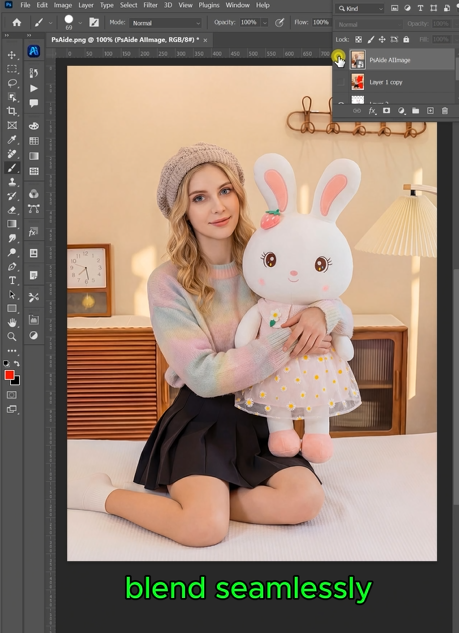
You have a beautiful lifestyle photo. A child or model is holding a doll, looking happily at the camera. The lighting is soft. The expression is perfect. The composition works.
But the toy is wrong. The client launched a new version. The colors don’t match the current packaging. Or the product was discontinued and needs to be replaced.
What do you do?
Reshoot? That means rebooking the talent, the photographer, the studio. Finding the same lighting conditions. Recreating the same expression. Thousands of dollars and days of scheduling.
Manually edit in Photoshop? A hand holding an object is one of the most difficult things to edit realistically. Fingers wrap around the toy in specific ways. Shadows fall between the hand and the object. The toy’s weight needs to look believable. The angle of the toy must match the grip. And soft toys have their own texture and floppiness that hard to replicate.
Most brands live with the wrong product in the photo. Their marketing suffers. Customers see outdated items. Trust erodes.
There’s a faster way.
1、The Solution: Nano Banana Pro in 3 Steps
Here’s how to replace any doll or plush toy held by a model using AI inside Photoshop.
What You Need
- Adobe Photoshop with PsAide plugin
- One model photo (holding original toy)
- One product photo (your new doll or plush)
- 60 seconds
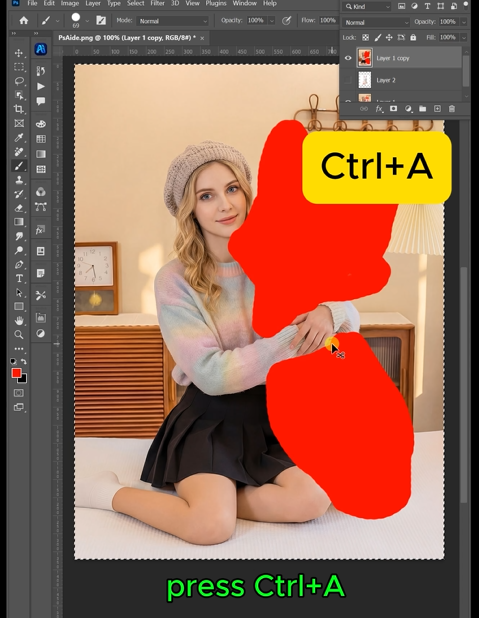
Step 1: Mark the Old Toy in Red
Open your model photo in Photoshop. Grab the Lasso Tool. Draw a rough selection around the doll or plush toy in the model’s hand. Include any parts that are visible — arms, legs, head, body.
Don’t worry about perfect edges around the fingers. Just cover the main shape of the toy. Fill the selection with bright red (RGB: 255, 0, 0).
The red color tells the AI exactly what to replace.
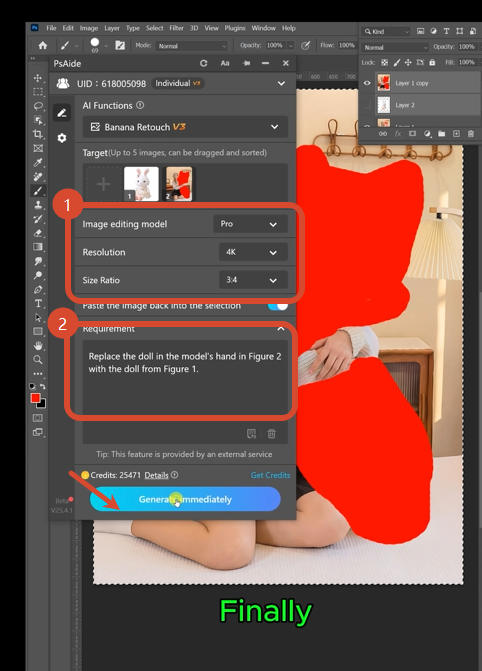
Step 2: Write Your Prompt
Open the PsAide panel. Launch Nano Banana and select the Pro version. Set output resolution to 4K. This is important for toys — higher resolution preserves small details like embroidered eyes, stitched smiles, and fabric textures.
Upload your two images in the correct order:
- Figure 1: Your new doll or plush toy product photo
- Figure 2: Your model photo with the red marking
Type this exact command:
“Replace the doll in the model’s hand in Figure 2 with the doll from Figure 1”
Click Generate. Wait 60-75 seconds.
Step 3: Get Your Result
The AI removes the red-marked toy. It analyzes the model’s hand position — how the fingers are curled, where the palm faces. It places the new toy at the correct angle to match the grip. It adjusts the toy’s scale to fit the hand naturally. It generates realistic shadows where the hand meets the toy. It preserves small details like facial expressions and fabric texture.
The model is now holding your new toy. Same pose. Same hand position. Same photo. Different product.
2、Pro Tips for Perfect Toy Swaps
1. Mark the entire toy. Include every visible part — head, body, limbs. The AI needs to see the complete shape to replace it correctly.
2. Use 4K resolution. Dolls and plush toys have small details — stitched eyes, embroidered noses, fabric grain. 4K preserves these details. 2K is acceptable for simple toys, but 4K is recommended.
3. Consider the grip. If the original toy is held in a specific way (one arm wrapped around, two hands holding), choose a replacement toy with a similar shape when possible.
4. Match the toy type. Replacing a soft plush bear with another soft plush bear works better than replacing a plush bear with a hard plastic doll. The AI handles different materials, but similar categories yield better results.
5. Keep your original layers. Save the PSD with your red marking. You can reuse the same model photo to swap multiple toy styles in seconds.
6. For small toys: Add “preserve small facial details” to your prompt for better eye and mouth rendering.
7. For floppy toys: If your new plush has hanging arms or legs, add “with relaxed, natural positioning” to guide the AI.
8. Check finger overlap. After generation, zoom in to check where fingers meet the new toy. Minor adjustments can be made with the Clone Stamp tool if needed.
3、Download link
https://psaide.com/?sfrom=A86R4u
Invitation Code: A86R4u