Table of Contents
Many apparel designers and e-commerce retouchers rely on Ps to extract printed chartlets from model photos, yet native Photoshop tools bring frustrating, time-consuming drawbacks. Manually cutting out clothing prints demands complex workflows including the Pen Tool, masking, warp adjustment and color correction. Thin fabric patterns, small logos and irregular print edges often result in jagged borders, distorted textures or lost fine details. Users spend 10–30 minutes per image, and batch processing becomes nearly impossible. Even skilled editors struggle to separate prints cleanly from wrinkles, skin tones and shadow gradients. Traditional retouching fails to produce uniform, pure-white background chartlets ready for textile printing, listing templates or design archives. This is where Nano Banana, the core AI retouch module inside the Psaide plugin, eliminates all native Ps pain points to extract complete, undamaged clothing prints automatically.
1、Step-by-Step Guide to Extract T-Shirt Print Patterns via Psaide Nano Banana Pro
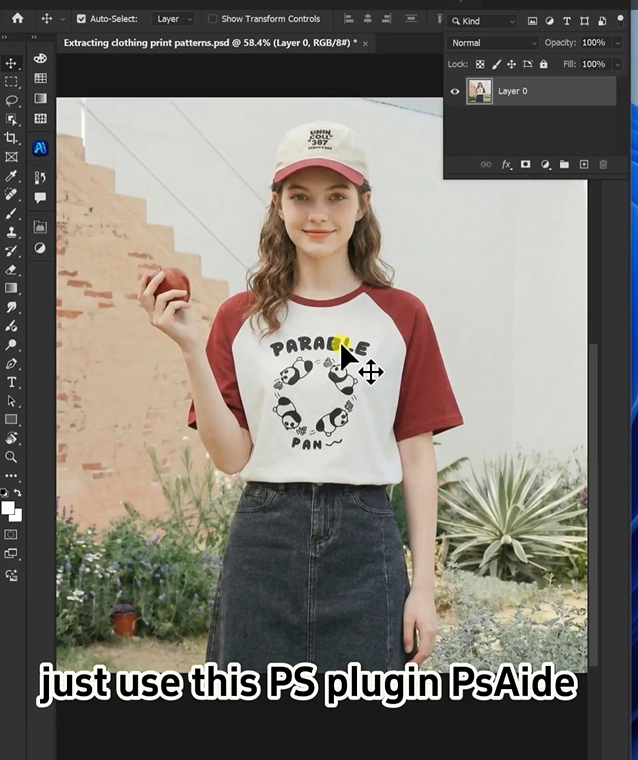
Step 1: Open the model photograph in Photoshop
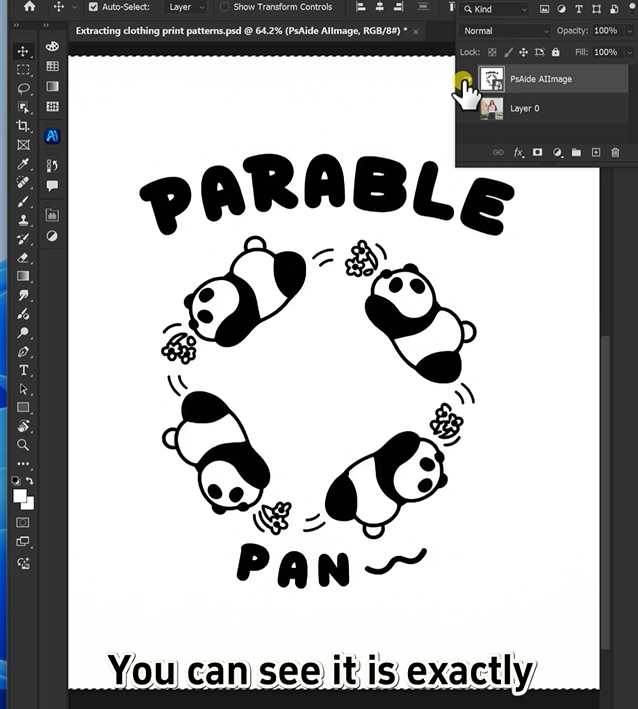
Launch your Ps software and import the original portrait image with the printed top worn by the model. Duplicate the background layer with Ctrl+J to protect the raw file from irreversible edits, no pre-cutting or manual selection work is required for the print area.
Step 2: Launch Nano Banana retouch module and configure high-definition parameters
Open the installed Psaide plugin panel within Photoshop, then locate and activate the Nano Banana retouch function. Select the Pro version for advanced texture recognition and accurate print separation. Set the output resolution to 2K to preserve every tiny line, logo and fabric detail of the chartlet. Upload the duplicated model layer image to the plugin’s upload zone. Paste this exact prompt into the text box:
Extract the printed pattern from the T-shirt in the image against a pure white background.
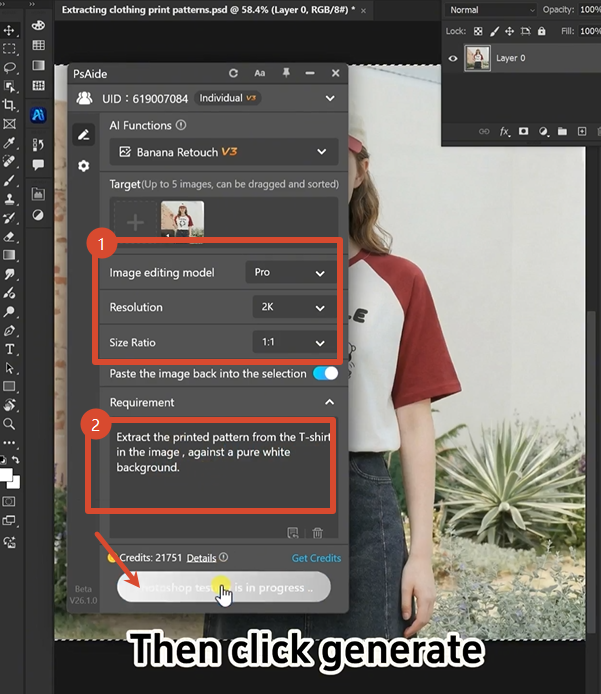
Step 3: Generate and export the isolated print pattern
Click the Generate button and wait 20 to 30 seconds for AI processing. Nano Banana automatically identifies the printed chartlet, detaches it from garment wrinkles and the model’s body, and places the complete pattern on a standard solid white canvas. The finished high-resolution layer loads directly into your Ps workspace, ready for immediate export as PNG or JPG files for design, production and e-commerce use.
2、Useful Tips for Better Nano Banana Pattern Extraction
Always choose Nano Banana Pro over the basic mode for intricate multi-color prints, as it minimizes texture warping. Stick to 2K resolution settings to avoid blurry chartlet outputs for textile manufacturing. If partial print loss occurs, re-upload well-lit front-facing model shots without heavy shadows. Keep the provided prompt unchanged for consistent pure-white background results; minor wording edits may disrupt the AI’s print isolation logic. For bulk model image batches, reuse identical Nano Banana parameters to maintain uniform pattern quality across all extracted chartlets, drastically cutting down your daily Ps retouch workload.
3、Download link
https://psaide.com/?sfrom=A86R4u
Invitation Code: A86R4u